Tuesday, October 30, 2012

Label basics

Basic label terminology:

The term “pressure sensitive” (when applied to labels) means the label has an adhesive that will adhere to a surface when downward pressure is applied. This type of label is also known as “self-adhesive”. I won’t be discussing C1S paper labels using water based glue (think Campbell’s soup can).

The majority of pressure sensitive (PS) labels utilize the following construction:


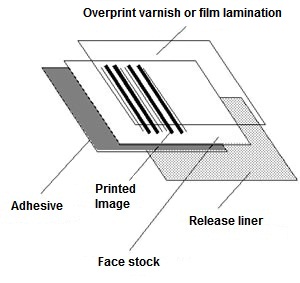
An over print varnish (OPV) or film lamination is used to protect the printed surface of the face stock and increase the label’s lifespan. OPV is traditionally a UV liquid applied in-line during the printing process. OPV can also be applied off-line depending on the selected production process. OPV patterns can also be applied via the silk screen printing process (although more expensive) and provide a unique textural feel to the label.

Overall film laminations can be applied to the printed surface of the face stock to further increase the life span of label or protect the face stock from high wear environments. An example might be an outdoor safety label exposed to the elements, a team label for football helmets, or a label used in long term POP retail displays. Film lamination is more expensive than UV top coating, but you have more choices for surface, thickness and substrate selection.

The face stock is the “backbone” of the label. It’s the material you see after the label has been applied. There is a huge selection of face stocks available; however the most common are coated paper, vinyl, polypropylene and polyester. Face stocks are also available as an uncoated substrate mostly for wine bottle and retail food products. The face stock that is removed during the manufacturing process (leaving just the printed label) is called the matrix. The matrix is almost always removed for labels destined to be applied using high speed automatic equipment. Below is an image of the matrix being removed from the roll:


The underside of the face stock is the adhesive (pressure sensitive adhesive, PSA). There are approximately 10 common types of adhesives used for PSA’s; although not all PSA’s are available on all substrates. Adhesive performance ranges from permanent, hi-tack permanent, removable, to re-positionable. Their chemical content ranges from rubber, acrylic to silicone. Specialty usage can be all-temperature, cold-temperature, and even an ultra-adhesive for low surface energy plastics. The usage, the face stock and the adherent all play a factor in determining the optimum adhesive for the application.

The liner (backing) acts as the carrier for the die cut label. The liner has a coating which allows the liner to cleanly release (aka “release liner”) from the face stock. This coating is most commonly silicone. Types of liners include SCK (super calendared kraft), PK (poly-coated kraft), LF (lay flat), PET (polyester) and BG (bleached glassine).

SCK: low cost, general all around liner for paper materials. Poor lay flat and moderate particulate levels.
PK: improved die cutting, handles deep die cutting better than SCK. Slightly lower particulate levels. Does not sheet well.
LF: excellent stability and resistance to curling. Best for sheeted label applications.
PET: durable and good for high speed die-cutting. Poor sheeting. Very low particulate levels (think clean room and pharmaceutical usage). Higher cost than SCK or PK.
BG: low cost, low to medium speed dispensing. Poor sheeting characteristics.

Delivery: Labels are generally die cut using a low-cost magnetic die, a steel die or a router based cutter for short-run digital labels. Your label manufacturer stocks a large variety of common shaped/sized “tooling” for producing labels. A magnetic cutting die is pictured below:


Not all substrates can be cut using inexpensive magnetic dies, and in those cases a more expensive steel die is required. As the run length increases (or the possibility of a reprint increases), a steel die investment becomes a conversation you need to have with your supplier. A steel die is pictured below:


If your label has any size flexibility, you would be wise to consult with your label supplier to determine whether a very small size change can affect or eliminate the tooling cost of the die.

Most labels are produced on rolls and applied using automatic affixing equipment. This is the most cost effective way to manufacture your label and almost all label printers use a roll-to-roll printing press for this type of production. If you are using automated equipment to apply your labels to the product you’ll want to specify the printed image orientation on the roll.


Above is a typical label position chart that shows how your label might be applied onto the finished product. You can see if you select the wrong position, your label may not be applied properly and the warehouse will not be happy campers.

For projects requiring labels to be sheeted, a “sheeter” tool is required. For shorter run labels, fitting the label to a larger sheeter tool will increase your material cost but eliminate the tooling cost. As the run length increases, an optimum sized sheeter tool becomes more cost effective and reduces your materials cost.

Labels printed on vinyl (PVC) are water proof, widely available, inexpensive and adhere well to unusual shapes. Unfortunately PVC is not recyclable and the chlorine component contributes to ozone depletion. The better alternative is polypropylene (PP). PP is recyclable, prints sharper than vinyl, and is cost effective against vinyl. The PP thickness choices and availability are still catching up to the more popular vinyl, but if you are looking to reduce your PVC usage in your supply chain, you should be considering PP.

Tuesday, July 17, 2012

Which is the best glue for Perfect Binding: Hot Melt or PUR

Many of you will recognize the binding style known as “perfect binding” or “adhesive binding”. Still fuzzy? The binding with the square spine (see attached image).


This type of binding is great for consistent page size, large page counts, mixing different paper types and a strong attractive finished product. It’s been the dominant binding method for annual reports and used for years on magazines like National Geographic and Vogue.


Specifying the right type of glue for your project is one key to meeting the clients expectations. There are two primary types of glues used for perfect binding: EVA (ethylene vinyl acetate) and PUR (polyurethane reactive); both are holt melt types. Which should you specify?


EVAs or hot glues were the original glues used for perfect binding. They have been around for many years, are inexpensive, cure almost instantly, and form a strong bond under most conditions. They do not hold up well in extreme temperatures and tend to crack as a result when too cold, fall apart when too hot or crack when overstressed. Hot-melts should be avoided when working with heavy coated stocks, stocks over 70# in weight, or finished products that will be exposed to excessive heat or cold weather. Expect the book to fail if you keep it in your car during a Palm Springs summer. Most monthly national publications use hot melt glue for economy…..of course they are using lightweight coated paper.


EVA hot melt glues are a good choice for binding uncoated paper (60# and lighter), economical short runs and very thin spines (provided the binding is supported with side stitching). The cost to bind a short run catalog with EVA hot melt is MUCH less expensive than the setup costs for the bigger PUR glue binding lines. BUT be aware the client needs to understand the tradeoffs of an economical EVA hot melt product as opposed to the superior features of PUR glue. EVA hot melt glues are very popular on the short run small foot print binding machines (Duplo or Horizon) found in smaller binderies and in-house operations. (inexpensive Duplo machine below)


PUR glues came along in the early 1990's; they seemed to answer many of the challenges inherent to perfect bound books: primarily flexibility, layflat qualities, and durability. Technically speaking, the polymers in PUR adhesives cross-link onto the stock via a chemical reaction with MOISTURE, thus facilitating adherence, increasing pull strength, providing greater resistance to hot and cold temperatures, and reducing waviness in wrong-grain projects. They have made an incredible impact on the perfect binding industry.


The market for PUR glue was originally driven by products such as software manuals, reference books, and high-end catalogs and now includes hard-cover books, catalogs, and annual reports. Check out the following advantages of PUR glue, as described by one chemical supplier:


1. Heat Resistance - Perfect bound materials hold up in temperature ranges all the way up to 200F. Conventional hot melts generally fail at 120F or less.

2. Cold Resistance - PUR does not fracture at temperatures as low as minus (-) 45F. EVAs are generally flexible to plus (+) 25F.

3. Adhesion - Because of their chemistry and molecular weight, PURs are formulated to adhere difficult stocks. This is particularly important in jobs with heavily coated stocks against the grain, traits common to annual reports, for example.

4. Flexibility - Books bound with PUR glue have excellent layflat qualities. The adhesive is very pliable, and less of it is required on the backbone. This is perhaps the most appealing aspect of PUR glue. Not only does it answer the problem of books that snap shut, or the "mousetrap" effect as it is called, there is far less unsightly glue seepage into the spine of the book.

5. Ink Solvent Resistance - PURs are virtually unaffected by the migration of printing ink vehicles. (PUR adhesives will not dissolve with exposure to things such as alcohol, toluene, and gasoline.)

6. Durability - All of the aforementioned benefits provide the printing industry with a ten-fold improvement in durability. Books destined for a long life or heavy use will retain their integrity. Durability is one of the premier reasons PUR glue has been such a success. In the past, perfect bound books were notorious for their lack of strength and durability over time. Now, even high-end catalogs that were previously sewn hold up well using PUR adhesives. Both page pull tests and flex tests measure substantially higher in books produced using PUR glue, with page pulls that average up to 40 to 60 percent better than with traditional adhesives.
There are many considerations when choosing an adhesive. As with any product, PUR glue has its limitations. It’s more expensive than traditional glues making it cost prohibitive for certain jobs (monthly publications). [PUR glues require special equipment as the adhesive cannot come into contact with air during application. It’s not simply a matter of changing the glue.]

Other downsides to PUR glue include the extra curing time necessary for acceptable handling because of the high moisture content necessary to activate the adhesive. PUR bound products should be lightly handled for the first 24 hours. PUR achieves 95% strength within 24 hours and therefore needs to remain exposed to natural air; it further cures over 72 hours. Post binding services, such as drilling, will need to wait 24 hours until the glue has a chance to set up. This adds time to your schedule.


Large Perfect binding line


Whether PUR adhesives are right for a given job is contingent on several factors: the life expectancy of the book, the end-use, and the budget. My best advice is to be diligent about discussing these details before producing the job.


PS: One of my vendors is installing a new 20 pocket PUR machine this week. The HOT new feature on this machine is “optical image recognition” which insures sequential signature positioning and results in error free production! It's the only one of its kind on the West Coast. If your books or catalogs require rigorous QC inspection upon arrival, you need to be using this equipment. Ask me for details.

Monday, July 2, 2012

Lightjet Prints for the Ultimate in Reproduction

If you are looking for the ultimate in superb digital reproduction quality, look no further than LightJet. Lightjet prints are the premier choice for producing high quality wall art, murals, retail signage, tradeshow graphics, corporate entry graphics and portrait photos. The hardware exposes digital images to photographic paper and film (rather than an inkjet printing process); the result is a photographic continuous tone rather than halftone dots which are common on offset press or ink-jet. True continuous tones are not possible with images printed using ink or pigments.


Lightjet exposes silver-halide photographic paper using three digitally controlled lasers (red, green and blue laser light) onto the photo-sensitive emulsion on the paper medium (or back-lit transparency substrate). The print is then processed using traditional photochemical means. After which, the photographic print is handled just as any other photo-print.


Lightjet natively supports RGB raster files. The 24 bit color continuous-tone device uses a large multitude of colors (up to 16,777,216) rather than the small number of colors available to 4-color press and 8-color ink-jet type devices. With a file of good integrity, posterization and banding are unlikely.


Our LightJet can image a 50" x 120" area. Prints are economically priced, and in larger quantities are less expensive than comparative inkjet printing. Lightjet photopaper is more fragile than traditional inkjet and therefore must be protected after imaging. A wide variety of photographic papers are available in gloss, matte, and supergloss. In addition, special metallic paper can be used to give your digital photo art a distinctive look. Also available are back-lit materials such as Duratrans and Duraclear transparencies.


My favorite mounting option is acrylic, providing a stunning smooth face surface. Acrylic comes in several thicknesses and depending on the size of the print, you’ll want to select a thickness that will look great given the final location. The print is generally mounted to the back side of the acrylic using an optically clear two sided adhesive. Once mounted to the face, a backer is added for additional protection and to permit hanging. Other mounting options for these fine customized digital photo prints can include Gatorfoam, foamcor, and sintra; UV lamination can be applied to the surface of the prints for added protection from the environment. A digital die cutter (CAD cutter) can rout out complex shapes and forms for custom contoured signage.


Friday, June 1, 2012

How can I find it, I don't know what it's called!

Have you ever tried to search for a particular item using the internet, but you didn’t know it’s name? Perhaps a song by an unknown artist or a certain vacation resort but didn’t know the name of the town? I once asked my friend, a music VP……. “hey you know that song and within the 5th sentence the lyrics sound like*****” ? ……..“ahh…..no….”. Alrighty now……..

I think we have all fallen into this time trap of searching.

Several years ago I was approached by Kinecta FCU to engineer a sign that would elegantly display a poster on an easel incorporating a "take-one" pocket. The poster was mounted to Sintra (rigid foam board) and the pocket would need to hold 50 sheets of a standard printed flyer “this week’s special offer”. So I designed a pocket that stood out from the base poster using a pre-drilled sheet of plexiglass (clear acrylic plastic) with 5 holes. Through each hole we installed a small decorative socket head screw which held the pocket to the poster and provided the framework for the printed sheets to reside.

Now I needed to find those hollow round rods that could keep the pocket properly spaced from the poster….but what were they called? I spent perhaps a half hour searching various websites until I came across the answer. It was a frustrating experience somewhat akin to a real life “charades”.


They are called standoffs. Unthreaded hollow rod trimmed to a specific length is generally called a spacer. If the rod is internally threaded it’s called a standoff. Which dear reader brings me to the point of this week’s blog post……. useful information about standoffs.

Standoff systems are used for retail displays, wall graphics, furniture, signs including ADA wayfinding and architectural detailing. Each system has a fastener component, a barrel and a head. The systems are generally available in a variety of lengths starting from 3/8” depth to 2” depth (with exceptions). The diameter of the barrels and heads start at 3/8”. There are some common head designs and some fancy designs more often used for architectural hardware.


The common colors are anodized aluminum, stainless steel and brass. One particular line is available in standard colors primarily for graphic display work.


When we use standoffs for display graphics (acrylic and Sintra) the first step is to drill holes through the substrate. The substrate is then placed against the wall and the drill locations transferred to the wall (have your pencil handy). The wall holes are drilled and an appropriate fastener is selected. The standoff barrels are then mounted to the wall; the substrate is then placed against the barrels and the head attached to each barrel.


Some standoff systems use an edge mount style, more common in the glazing industry (glass/mirror).

I’ve attached a number of images to this post. As you can see there are a variety of standoff systems available running from mild to wild. Now you know what those round metal things are called!


Friday, March 9, 2012

Basics about Boxes

The most popular style box is a Regular Slotted Container (RSC), also called a shipping box. RSCs are the most commonly used boxes. They are usually brown kraft in color, have four flaps on the top and four flaps on the bottom. The side walls are sealed at one corner, this is known as the "Manufacturer's Joint." This design is highly functional for most packing applications. A special die is generally not needed to make a RSC, it’s made using a box slitter machine.
I’m going to limit this post to discussing RSC style boxes.


How to measure a box.
Corrugated box sizes are measured from the inside. The size of your contents determines the inner box dimensions. In the United States, the dimensions are listed in the following sequence: Length (L) x Width (W) x Depth (D). Dimensions are based on the opening of an assembled box. Looking at the opening, the longer of the two sides is considered the "length." The shorter of the two sides is the "width." The side perpendicular to the length and width is the "depth" of the box.
Box Construction - What you need to know
The "Manufacturer's Joint" is where the two ends of the vertical side panels meet to form the box. We also call this a glue tab; larger RSC joints are sometimes secured with tape or staples. The side panel thickness and content weight will determine the type of seal used for the manufacturer's joint. For example, glue is used for most single wall RSC boxes. Staples are found in some double wall and in most triple wall boxes.
Box Strength
The strength of a corrugated box starts with its material. A corrugated sheet consists of two major components – the linerboard and the medium (the flutes). The linerboard is the flat paper that covers both sides of the sheet and the medium is the "fluted" paper found between both liners. The flute is anchored to the linerboard with a starched-based adhesive. When placed vertically on its ends, the flutes form vertical columns, capable of supporting considerable amounts of weight. If the flutes are positioned horizontally, the box will crush easily and not adequately protect the contents.


Although corrugated sheets come in five basic flute heights and shapes, these 3 are the most popular. C-Flute is the most common flute style and is used for RSCs. C-flute is thicker, with more air space, and offers enhanced stacking strength. "B-Flute" (used for die-cut boxes) is compressed and appears thinner, however it is made with more paper to provide stronger side wall protection from blows and punctures. E-flute is thinner, flatter and provides a better surface for graphics.
The amount of virgin pulp fibers and the length of those fibers in a corrugated sheet substantially contribute to box strength. For example, the difference between a 200# test box and a 275# test box is that the latter has more pulp fibers in its corrugated linerboard. The 200# test box is rated to hold up to 65 lbs. of box and contents while the 275# box can hold up to 95 lbs. of box and contents. A 350# test box is rated to hold up to 120 lbs. of box and contents.
Liner color
RSCs are normally manufactured with kraft colored fiber. The corrugated sheet can be ordered with white one-side (very common), white two-sides (not so common) and triple white. Triple white is a combination of a white liner on both sides, and white flutes. Triple white is rather expensive and minimum orders apply. Triple black is also available but it’s primarily used for short run custom die cut boxes.
The Box Maker’s Certificate
One way to make sure that the material of the box you're purchasing meets industry standards is to review the Box Maker’s Certification Stamp, usually printed on one of the bottom flaps of the box. The stamp identifies the material as "singlewall," "doublewall" or "triplewall." It also indicates some rather dry technical strength information that I won’t go into at this time.
When & What Box to Use
If the box and contents weigh less than 65 lbs, you can consider a single wall 200# test . This weight limit works well for multiple light-weight items in a box or for a masterpack box where individual boxes are packed tightly in organized rows and stacks. The more valuable your contents, the more conservative your box requirements need to be.


If a single heavy item is to be shipped in a single wall 200# test box, we recommend a weight limit of 45 lbs. If it’s heavier you should upgrade to a 275# test single wall box or consider a custom box that utilizes “full flaps”. Simply apply common sense and always err on the conservative side.


Additional ways to insure your contents is protected.
If you have experienced damage claims or your shipment have arrived looking less than satisfactory, here are some simple ways to improve the quality of your packaging. I’ve listed them in steps from the least expensive solution to a more secure complete solution.


1) Use the “H” pattern sealing method. The diagram shows how to properly seal a box for cross country transportation. If you are sourcing poorly made boxes and cheap sealing tape, this method can still improve the safety of your contents. Be sure to tape the top and bottom using this method. If you find you need additional protection, go to the next step.


2) Invest in a quality sealing tape. You can find cheap sealing tape, but the adhesives are weak and during the summer months, as your package travels across a warm mid-west, you may find the weak adhesive releases prematurely. Polyester sealing tape with a strong adhesive will provide you with the best sealing strength. You don’t need to upgrade to the expensive 3M tape. Remember to use the “H” pattern sealing method.


3) We’re seeing more and more boxes with poorly formed, weak kraft primarily from boxes purchased on-line. The fibers are overly recycled (too much gray newsprint) and the fiber direction is not-uniform. If you use a stock size box, ask for a sample of the kraft you’ll be purchasing. The cost of a custom high quality singlewall RSC will provide you more protection for your product.


4) Still having problems or you ship valuable merchandise? Upgrade to a 275# test box.


5) The next step would be to upgrade to a double wall style corrugated box. It’s C-flute married to a sheet of B-flute. You’ll need to be able to order about 500 units or more. The double wall style provides significantly higher stacking strength and a more durable corner.


6) Use kraft tape with a water based adhesive. It adheres to corrugated linerboard much better than plastic sealing tape. The tape is available in plain or re-enforced fiber. This type of tape is my favorite no matter what weight I’m shipping. Applied via the “H” pattern, this tape provides a very sealed environment and keeps the flaps very snug.


My BEST suggestion for improving the strength of your home shipment:
When I ship a package from home and the strength of an existing box needs to be improved (usually because the box was previously used), I cut 4 panels of corrugated from an old box to match each inside panel in height and width. I make sure I place the flutes in a vertical position and then pack the contents inside the box. I add extra paper to take up any space. I call this the poor man’s double wall box. The extra layer of corrugated improves the vertical stacking strength. The box is then sealed in an H pattern using gummed paper tape. I use un-reinforced paper tape at home because most of my shipments are relatively light.